Showing posts with label Process in pictures. Show all posts

Friday, November 6, 2015

Washi Solution: Organization or On-The-Go

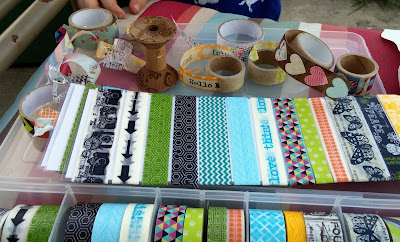
Today I was deciding what washi tapes I wanted to use in my planner and how I could take them with me on-the-go.  I started looking for old packaging I could use that had a plastic feel.  I couldn't find anything, so I cut up a 12 x 12 card stock into strips that would easily fit in the pack of my planner.  I ended up making four strips and laminating them to get the plastic feel.  Having the plastic coating allows the washi to be removed easily.  


I started adding the washi!
Every couple rows I would make marks with a ruler to keep them straight.


I ended up using the last of several roles, which is fine because I plan to put away the box of washi until I need to replenish sections of the laminated card stock.


I ended up making a lot more room in the tray I use for storing washi.  


Here is the final product!  I really like them and I plan on keeping them in my small tote I use for my planner, handlettering, and bible journaling.  It pretty much just hold my go-to products such as alphas, microns, markers, glue.....and so on.  Now I have all my washi in one place, and its so compact!


I hope you enjoyed this post!  If you did please consider sharing :)  <3 

Thank you!


Thursday, August 21, 2014

Love

 Hello!  I'm back with another process in pictures post.  This one is one of my favorites because of the pretty colors and grunge look.  I started by laying down torn book pages using matt medium.  

I set chipboard letters on my page and sprayed over them with "berry" alcohol ink.  I added black acrylic paint to the right edge and dry brushed over the rest of the page to make the book page edges stand out.  

I made puddles of blue alcohol ink, made splatters by hitting my paint brush in it, and added some on other places on the page to make some purple.  I prayed a piece of burlap with "butterscotch" alcohol ink and adhered it with matte medium.  I went over the black on the page with sandpaper to give it more of a grudge look.  

I added a peice of washi, random clump of thread, and a button.  I wish I wouldn't have but I added gold acrylic to the burlap.  I also added some more black acrylic to the washi.  

I added butterflies with a stencil and StaZon metallic silver ink.  The circles are a stamp that I made.  I also added unreadable writing stamp with blue StaZon.  I went around the edges of the letter and butterflies with a super fine painters pen.  

I added gesso over the entire page with a card and added a black stamp to the top butterfly.  I went around all the edges with the painters pen, smearing as I went.  The smaller letters are stamps that I went over again with the painters pen.  

I hope you enjoyed this post :)  Leave a comment!!!

Thursday, August 14, 2014

Be Intentional Today

This is my first blog post on my art journaling.  I took pictures throughout the process so that I could make this post showing what I used and how.  I found a free book at the library about raising adolescent children, and since I have two young girls I decided to use it in my creative process.  I modge podged all of the ripped book pages down.  I then spread gesso all over the page.  I used a diamond stencil to help create the kite. 


I used gelatos for the background because they are transparent.  I put down the red first, then orange around the red, and yellow everywhere else.  I left the kite alone.  

Using a stencil and baby wipe, I wiped off some of the gelatos.  After this step I added modge podge over the entire page to keep the gelatos in place.  I had to add a pretty thick layer so that they wouldn't smear with my brush.  


Using a stencil and "Bleu Turquoise" acrylic paint I added the blue swirls randomly, again leaving the kite alone.  


I used H2O's shimmer watercolor to paint the kite.  The dragonflies were made with a stencil, a make-up sponge, and StaZon Jet black ink (my favorite ink ever).  I added two pieced of ephemera from the Maggie Holmes ephemera packs after distressing the edges.  I added gelatos around the edges of the camera to smear them in.  


I painted strips of book pages and cut them out with an xacto knife.  After adding them I added shading to the bottom of them.  


This is the final product.  I am happy with everything except the writing on the kite strings.  I either need to change from using modge podge or find a good pen to use for writing.  I went around the tree branch and edges of the page with a charcoal pencil.  

I hope you enjoyed this process post.  Please leave me comments!! :)